Integrating NEAR AI Agents
Easily integrate your Agent or any NEAR AI Agent into an existing application. There are two main pathways to accomplish this:
- iFrame Agent Embedding - Simple high-level integration with just a few lines of code
- Agent API - Lower-level integration for use when orchestrating multiple agents
iFrame Agent Embedding
The quickest way to integrate a NEAR AI Agent into any existing website is with an iFrame. This allows users to interact with your agent without leaving your site.
Basic Embedding
To embed an agent, use the following iframe code replacing the src with the agent you want to embed.
Example:
<iframe
  src="https://app.near.ai/embed/<your-account.near>/<your-agent-name>/latest"
  sandbox="allow-scripts allow-popups allow-same-origin allow-forms"
  style="border: none; height: 100svh;">
</iframe>
Info
-
Note that the difference with this
srcpath compared to a regular link to your agent is that it is using theembedendpoint. -
Also note that you can replace the
latestwith a specific agent version number.
Tip
You can also copy/paste the snippet from the NEAR AI Dev Platform.
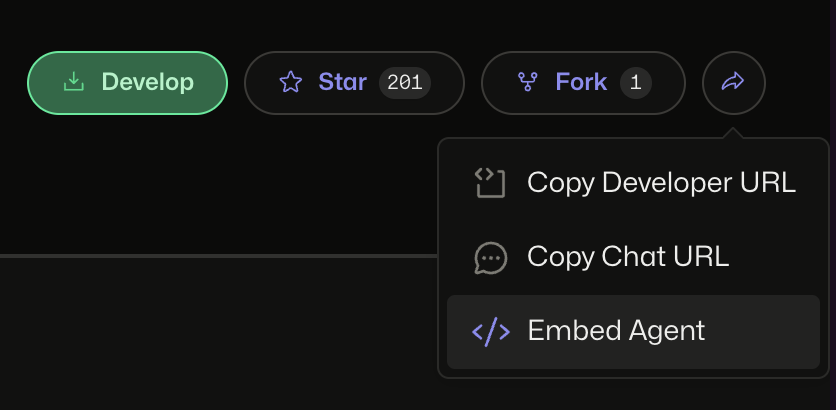
- Clicking the
shareicon from your agent page and select<embed>
Customizing the Embed
There are three ways to customize the appearance and behavior of your embedded agent:
- Basic
<iframe>attributes - URL parameters
metadata.jsonfile
Info
The embedded agent will inherit the styling of the NEAR AI platform while maintaining a consistent look and feel with your website.
Light or Dark Theme
For light or dark themes, add a theme parameter to the embed src URL:
src="https://app.near.ai/embed/<your-account.near>/<your-agent-name>/latest?theme=dark"
Custom Logo
You can also add a custom logo to replace the default agent name in the upper left hand corner of your agent.
In your metadata.json file add an embed section under the agent details:
Agent API Integration
NEAR AI Agents are compatible with the OpenAI Assistants API, making it easy to integrate powerful AI capabilities into your applications. The API enables NEAR AI agents to:
- Call various models with specific instructions to customize personality and capabilities
- Access multiple tools for enhanced functionality
- Maintain persistent conversation Threads
- Process files in several formats (as inputs or outputs)
See the complete NEAR AI OpenAPI specification.
Info
While you can orchestrate multiple agents, in many cases you can consolidate multiple roles into a single agent. For best practices, see "Orchestrating Agents".
Key Concepts
| Concept | Description |
|---|---|
| Thread | A conversation session between an Assistant and a user. Threads store Messages and automatically handle truncation to fit content into a model's context. You create a Thread once and simply append Messages as users reply. |
| Message | Content created by an Assistant or user. Messages can include text, images, and other files, and are stored as a list within a Thread. |
| Run | An invocation of an Assistant on a Thread. The Assistant processes the Thread's Messages using its configuration to perform tasks by calling models and tools. |
| Run Step | Detailed record of actions the Assistant took during a Run. Examining Run Steps allows you to see how the Assistant reaches its conclusions. |
| Service Agent | A specialized Agent called by the Assistant to accomplish specific tasks (e.g., purchasing, swaps, smart contract generation). |
Implementation Guide
NEAR AI provides a powerful Assistant API that you can integrate into your applications by following these steps:
- Authentication: Login to NEAR Account
- Create a Thread
- Add Messages to the Thread
- Run the Assistant on the Thread
- Process Assistant Responses
1. Authentication: Login to NEAR Account
From client side, you can use the following NEAR Wallet Selector function to sign the message and get the required NEAR AI authorization token.
async function login(wallet, message, nonce, recipient, callbackUrl) {
    const signedMessage = await wallet.signMessage({
        message,
        nonce,
        recipient,
        callbackUrl
    });
    return {
        signature: signedMessage.signature,
        accountId: signedMessage.accountId,
        publicKey: signedMessage.publicKey,
        message,
        nonce,
        recipient,
        callbackUrl
    };
}

// Generate nonce based on current time in milliseconds and
// pad it with zeros to ensure its exactly 32 bytes in length
const nonce = Buffer.from(Date.now().toString().padStart(32, '0'));
const recipient = YOUR_RECIPIENT_ADDRESS;
const callbackUrl = YOUR_CALLBACK_URL;

// Example usage of login function
const auth = await login(wallet, "Login to NEAR AI", nonce, recipient, callbackUrl);
In Python, we recommend using the nearai CLI to login into your NEAR account. More details here.
2. Create a Thread
A Thread represents a conversation between a user and one or many Assistants. You can create a Thread when a user (or your AI application) starts a conversation with your Assistant. For more information see Threads.
3. Add Messages to the Thread
The contents of the messages your users or applications create are added as Message objects to the Thread. Messages can contain both text and files. There is a limit of 100,000 Messages per Thread and we smartly truncate any context that does not fit into the model's context window.
4. Run the Assistant on the Thread
Once all the user Messages have been added to the Thread, you can Run the Thread with any Assistant. Creating a Run uses the model and tools associated with the Assistant to generate a response. These responses are added to the Thread as assistant Messages.
Runs are asynchronous, which means you'll want to monitor their status by polling the Run object until a terminal status is reached. For convenience, the 'create and poll' SDK helpers assist both in creating the run and then polling for its completion.
5. Process Assistant Responses
Once the Run completes, you can list the Messages added to the Thread by the Assistant.
You may also want to list the Run Steps of this Run if you'd like to look at any tool calls made during this Run.